Table of contents Link to heading
- Running mmc_bp_enable
- Changing mmc bootpart from linux or u-boot
- Preparing a bootable sdcard
- Odin T-Flash mode
- dd’ing onto a sdcard
- Conclusions and references
Most of Samsung’s phones and tablets uses a bootloader called S-Boot. By hooking up a serial debugging cable and pressing enter a bunch of times when device boots, it is possible to get to the so call S-BOOT shell. This shell is available on pretty much all Samsung devices, at least from 2011 and onwards. Oldest source I know that outline how to reach the shell is by Nitay Artenstein and Gilad Goldman for Galaxy S7 in 2017, but it was probably known earlier than that [1].
In the S-Boot shell, some devices have a command called mmc_bp_enable, which will make the bootrom of the device, i.e. the very first bootloader stage that is hardcoded into the SoC, load the bootloader from the external sdcard instead of internal eMMC.
Generally speaking this mode is only useful if something is wrong with internal eMMC, in which case one can boot S-Boot from sdcard, and then re-partition the device to try to fix the eMMC. The bootloader still has to be signed, so sdcard boot is not an easy way to circumvent secure boot. For Exynos 4412 though, there exists a signed bl1 (first bootloader stage) from exynos4412-odroid-x u-boot sources as I understand it [2] that does not check signature of later stages, and thereby allows booting arbitrary code. Fully having the bootloader and operating system installed to an sdcard can be convenient for automatic testing of u-boot and linux, as we can then make changes simply by writing to the sdcard, without involving Samsung’s Odin-Loke download mode.
In the next few sections I will dig into the sdcard boot mode, and different ways to enable or disable it.
Running mmc_bp_enable Link to heading
Not all devices support mmc_bp_enable. Galaxy S3 LTE (I9305) does for example, but not galaxy S3 (I9300). Running help from the S-BOOT shell will show available commands (here from Galaxy Tab S2):
S-BOOT # help
Following commands are supported:
* chipinfo
* help
* log
* load_kernel
* boot
* reset
* findenv
* saveenv
* setenv
* printenv
* checksum_need
* mobiload
* mobismc
* iccc_smc
* usb
* upload
* keyread
* readadc
* printcsd
* rpmbwritedata
* rpmbreadcount
* rpmbsetkey
* rpmbclose
* rpmbopen
* sdcard_read
* sdcard
* mmc_bp_enable
* usb_write
* usb_read
* max77843_usb_write
* max77843_usb_read
* max77849_usb_write
* max77849_usb_read
* smp_boot_test
To get commands help, Type "help <command>"
Running mmc_bp_enable gives something like:
S-BOOT # mmc_bp_enable
[MMC] ext_csd[179] = 0x48
argv[0] : mmc_bp_enable
[MMC] ext_csd[179] = 0x40
This seems to change a bit in the eMMC device EXT_CSD register, which the bootrom/irom then apparently reads before loading the bootloader.
It is worth pointing out that trying out different commands can be dangerous. Messing with the rpmb (Replay Protected Memory Block) for example can easily brick your device.
Changing mmc bootpart from linux or u-boot Link to heading
Luckily, even if the device does not support mmc_bp_enable there is a way to toggle the flag from Linux. Install mmc-utils [3] from your distro package manager, and run
sudo mmc bootpart enable 0 1 /dev/mmcblk0
to enable sdcard boot, and run
sudo mmc bootpart enable 1 1 /dev/mmcblk0
to disable it again. Run sudo mmc extcsd read /dev/mmcblk0 before and after the command to see the current settings, under “Boot configuration bytes”, the diff will be something like:
@@ -72,8 +72,8 @@
 Power class [POWER_CLASS: 0x00]
 High-speed interface timing [HS_TIMING: 0x01]
 Erased memory content [ERASED_MEM_CONT: 0x00]
-Boot configuration bytes [PARTITION_CONFIG: 0x48]
- Boot Partition 1 enabled
+Boot configuration bytes [PARTITION_CONFIG: 0x40]
+ Not boot enable
  No access to boot partition
 Boot config protection [BOOT_CONFIG_PROT: 0x00]
 Boot bus Conditions [BOOT_BUS_CONDITIONS: 0x01]
where we can recognize that the PARITION_CONFIG change 0x48 to 0x40 is similar to the output from mmc_bp_enable
Preparing a bootable sdcard Link to heading
Now we know how to reliably enable the sdcard boot mode, but how to we flash our bootloader onto an sdcard in a way so that it can be booted? Samsung’s official flasher program, Odin, has a “T-Flash” mode which does exactly that.
Odin T-Flash mode Link to heading
Normally Loke, the code receiving the flashed partitions from Odin, writes to internal eMMC, but if T-Flash is enabled in Odin settings, it writes to the sdcard instead.
Heimdall, an open-source implementation of Odin for which I maintain a fork, also supports T-Flash mode. For flashing with Heimdall you need to be sure which partitions are really needed though. If you try to T-Flash the BOOTLOADER image, and not the TZSW (if separate), then Loke will error, and as always without an human readable error message unless you have a serial debugging cable connected to UART pins on main board.
After doing a T-Flash flash we can inspect the data on the sdcard and see what actually happened. Turns out it is pretty straightforward to replicate with standard linux tools like dd.
dd’ing onto a sdcard Link to heading
The bootloader, and tzsw if not part of sboot.bin, should be embedded in the bootloader, but with one extra block offset compared to when flashing to internal eMMC.
On exynos 4412 devices like Galaxy S3 we can simply create a bootable sdcard with dd through:
sudo dd bs=512 seek=1 if=./sboot.bin of=/dev/sda
sudo dd bs=512 seek=1735 if=./tz.img of=/dev/sda
The seek offsets here are simply the “Partition Block Size/Offset"s from the device PIT +1. For clarity the Galaxy S3 PIT contains:
--- Entry #0 ---
Binary Type: 0 (AP)
Device Type: 2 (MMC)
Identifier: 80
Attributes: 2 (STL Read-Only)
Update Attributes: 1 (FOTA)
Partition Block Size/Offset: 0
Partition Block Count: 1734
File Offset (Obsolete): 0
File Size (Obsolete): 0
Partition Name: BOOTLOADER
Flash Filename: sboot.bin
FOTA Filename:


--- Entry #1 ---
Binary Type: 0 (AP)
Device Type: 2 (MMC)
Identifier: 81
Attributes: 5 (Read/Write)
Update Attributes: 1 (FOTA)
Partition Block Size/Offset: 1734
Partition Block Count: 312
File Offset (Obsolete): 0
File Size (Obsolete): 0
Partition Name: TZSW
Flash Filename: tz.img
FOTA Filename:

[ ... ]
There exists some “sdcard recovery” guides from Samsung, for how to use T-Flash to restore devices with broken internal eMMC. For Galaxy S3 such a guide, and the required files for it, have been discussed quite a lot on XDA. See for example Myles McNamara’s blog post about it [4], with still alive links to the files.
Conclusions and references Link to heading
For Exynos 4412, the sdcard boot mode and the bl1 that loads unsigned blobs simplifies development. Paired with a usb-sd-mux [5], and by connecting to UART on main board as discussed in my previous post [6], it almost becomes possible to do automatic CI-testing of u-boot and linux.
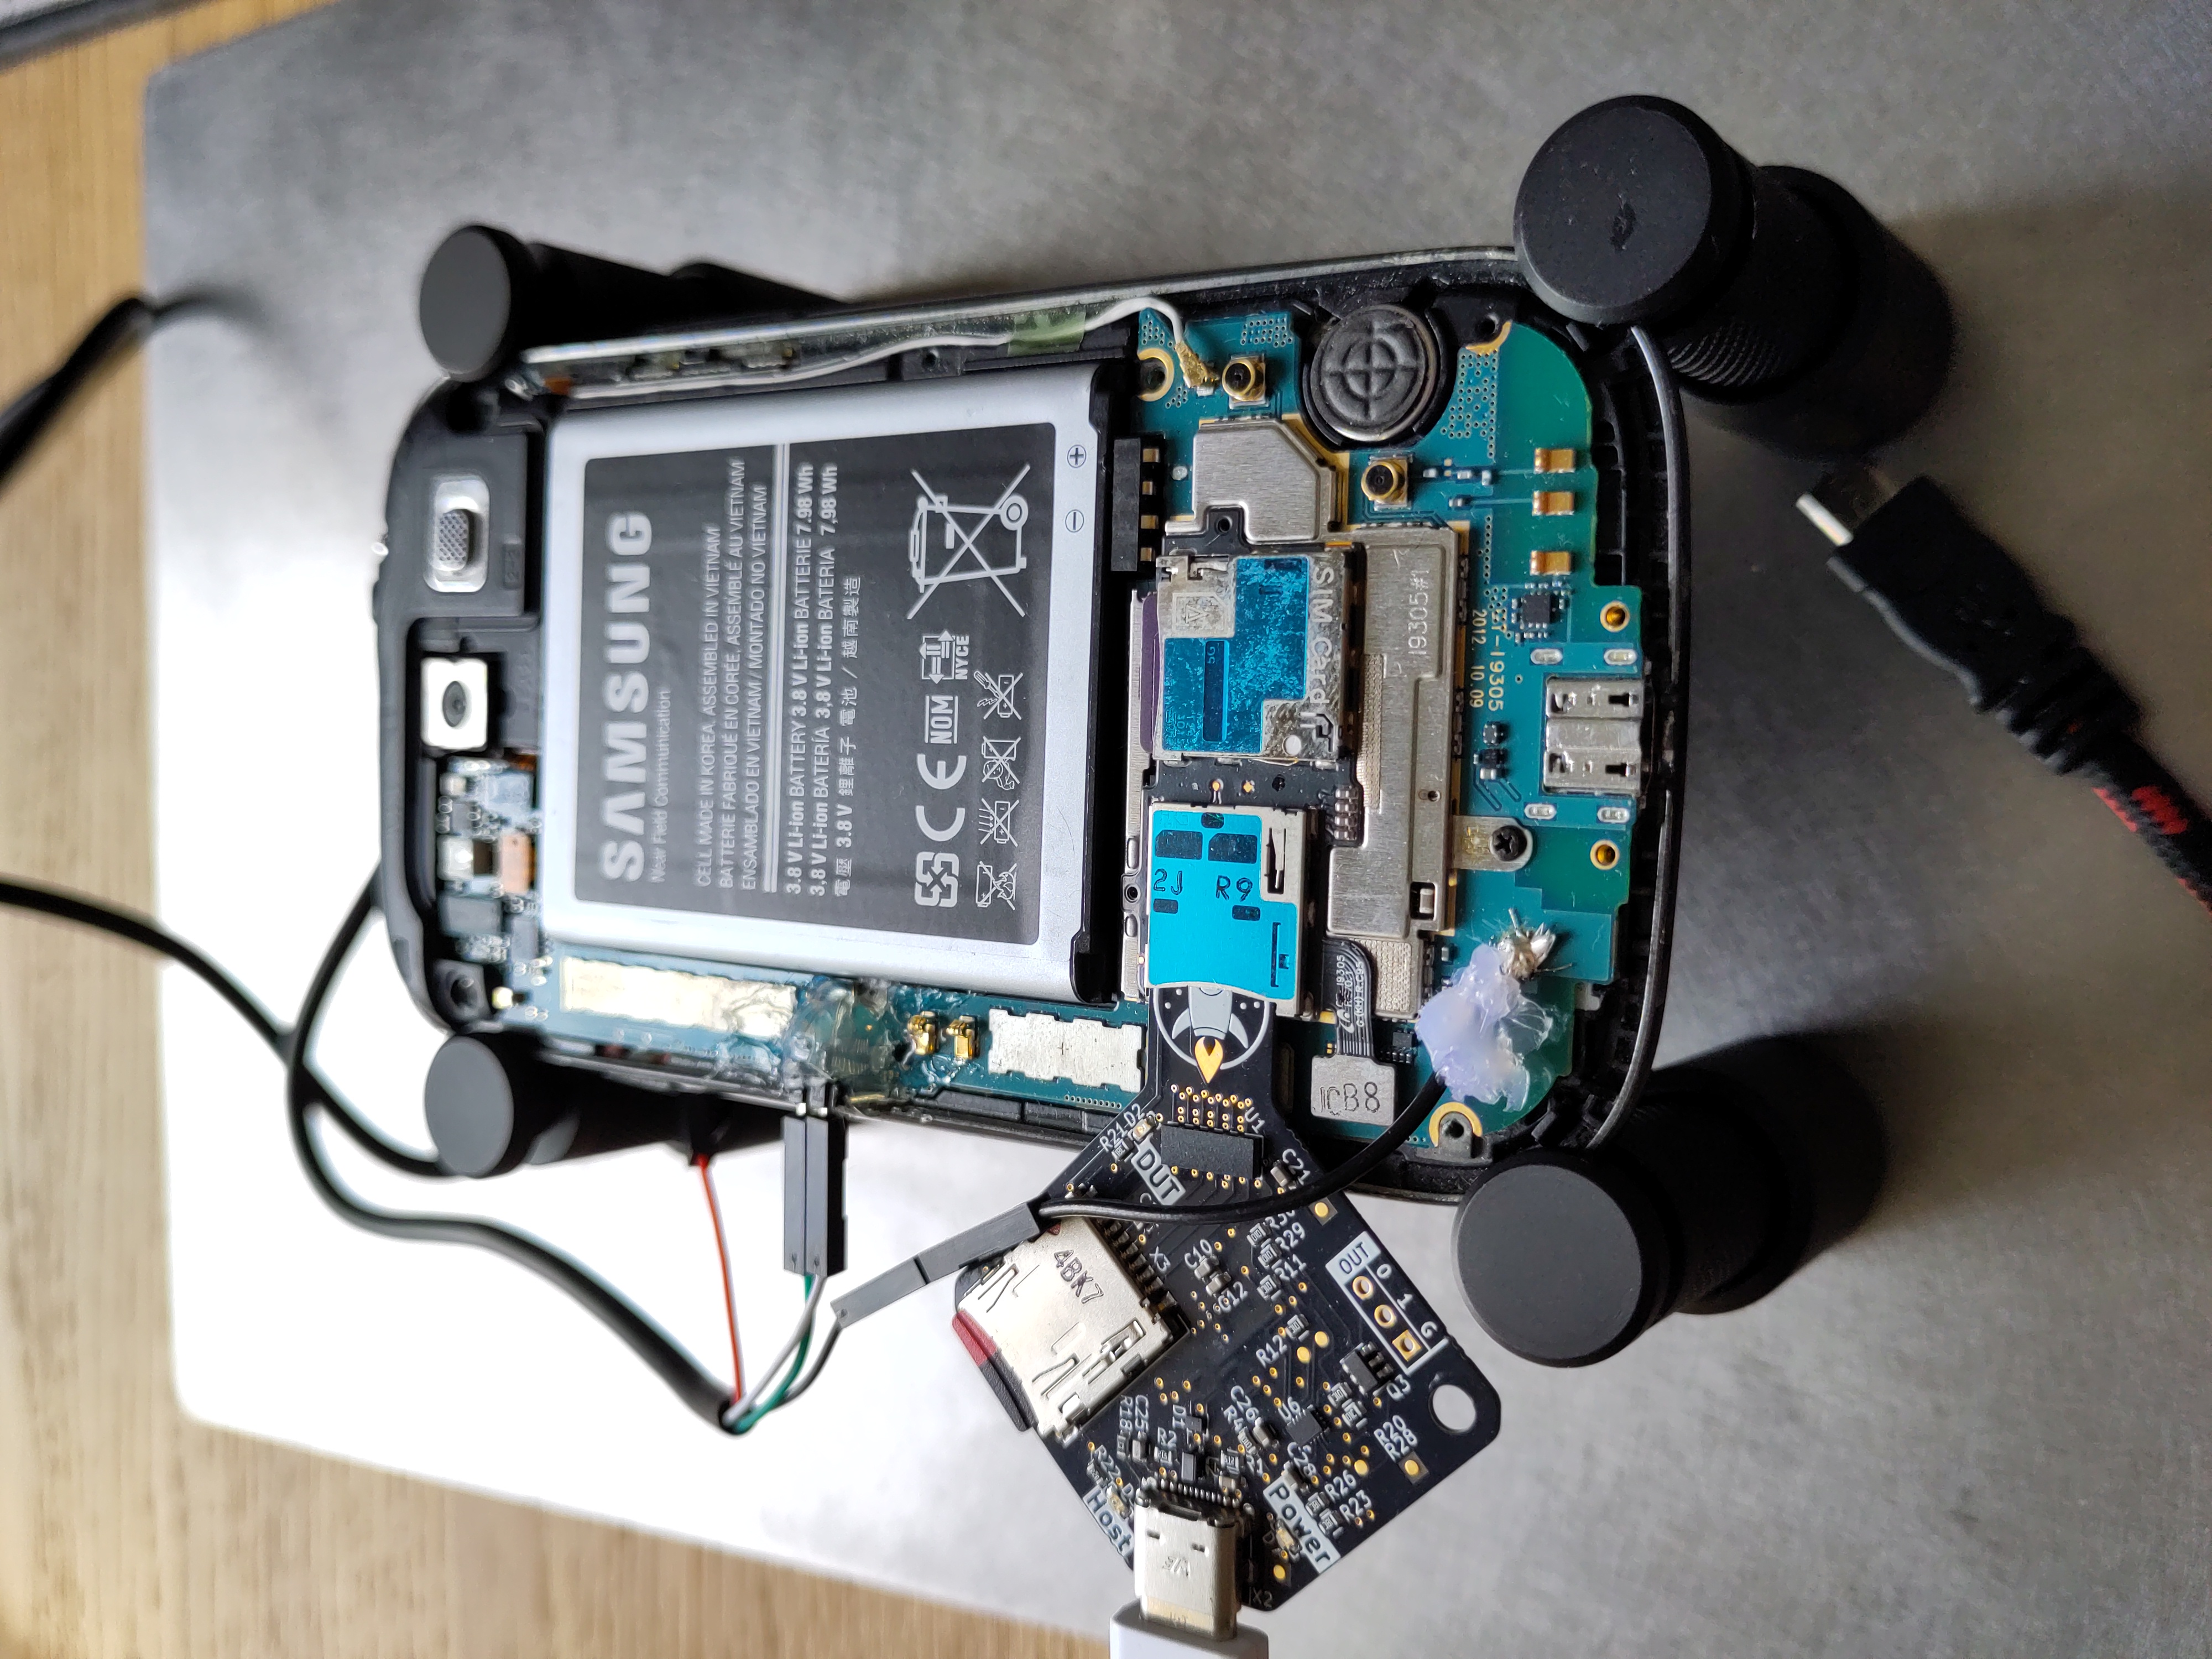
Galaxy S3 with uart and an usb-sd-mux connected
Only thing I am missing is a way to turn on and off the device remotely, and I am looking at making a pass-through cradle for the battery that lets me do exactly that. More on that in the future!
[1] https://hexdetective.blogspot.com/2017/02/exploiting-android-s-boot-getting.html
[2] https://github.com/dmarszk/exynos4_uboot/blob/master/sd_fuse/p4412_s_fwbl1.bin
[3] https://git.kernel.org/pub/scm/utils/mmc/mmc-utils.git/
[5] https://shop.linux-automation.com/index.php?route=product/product&product_id=72